
Rclone is a command line tool that can be used to manage files on cloud storage. It’s supported by over 40 cloud storage providers including Google, Amazon, Microsoft etc. It’s easy to use and is open source.
Rclone is a great tool, because once you are using it you can switch between your cloud storage options, without need of learning new commands or updating all your backup related scripts. Additionally, you don’t need other tools for encrypting your backup. Since your data is encrypted, you don’t need to ponder which cloud storage you can trust. Simply select the best deal that suits your needs!
In this article I will show you how to create encrypted backup to a cloud storage, using Rclone.
Installation
Ubuntu/Debian:
apt install rclone
Fedora:
dnf install rclone
Default repositories don’t necessary have the newest version of Rclone, but you can check the other download options from Rclone.org download page.
Setting up a remote destination
Rclone has a helper tool to create the config file. This can be launched with the “rclone config” command. The “new remote” prompt can vary depending on which storage system is selected. In this article we will use an SFTP backend as an example. For other storage systems, there is further documentation available from Rclone’s website. SFTP in Rclone will work with any host you have SSH access to. If you have SSH key set up correctly, passwords are not required.
When you run rclone config. It will give a prompt about missing config file on the first run. It should look like something like this:
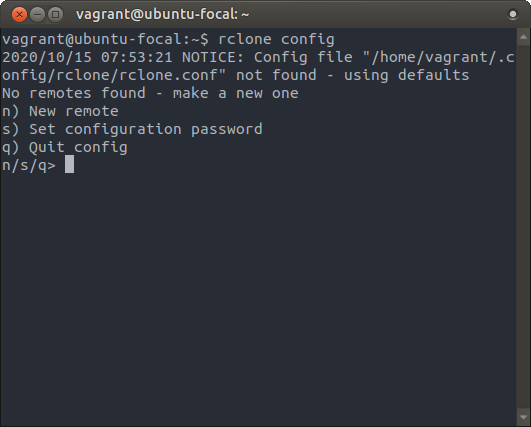
To proceed, press “n”. Next, come up with a name for your remote and then select from the list which storage system it is. After that, you will be prompted for a host, user, port and password.
name> remote
storage> sftp (number 26 in Rclone version 1.50.2)
host> example.com
user> (press enter for current user)
port> (press enter for default port 22)
password>  (press enter to use SSH key)
After these basic details you can leave the rest options empty unless you want to use the extra features. If something went wrong you can always manually edit .config/rclone/rclone.conf.
Now you should have a working remote. Next you should create a directory on your remote that will be used in the next section for encrypted remote (many other storage systems than SFTP call directories “buckets” in the documentation). In this example remote is named “remote” and the new directory is called “directory”:
rclone mkdir remote:directory
With SFTP backend this will create a directory in your home folder on the host. For other backends it’s beneficial to check the dedicated storage system page from Rclone.org.
Encrypted remote
Now you should have a normal working remote and a directory so that we can use them to setup an encrypted remote. Run rclone config again and select “n” for another new remote.
Encrypted remote in this example will be called “secret” but you can of course choose something else. The storage type should be “crypt” and remote should be what you previously created, in our example “remote:directory”. You could also crypt the whole remote with “remote:” but that is not really recommended according to the Rclone’s documentation.
name> secret
host> remote:directory
storage> crypt (number 10 in Rclone version 1.50.2)
Next, choose if you want to also encrypt the filenames or directories. Then enter your password and salt, or let Rclone generate those for you.
Making a copy
Once the encrypted remote is added, you can copy your local file to the cloud:
rclone copy localfile secret:
Or the whole content of a local directory to the cloud storage:
rclone copy localdir secret:localdir
Later, you can use sync to update the remote directory with just the changes. If you deleted files, sync will also delete them from the remote. Include --dry-run if you want to see the changes first.
rclone sync localdir secret:localdir
Restoring from the cloud to local:
rclone copy secret:localdir localdir
Useful features
Rclone also has a mount command. You can easily mount your cloud storage with:
rclone mount secret:localdir /mnt/somedir
Mount doesn’t give any feedback on the screen when the storage is mounted (just an empty line). However, if you check the mount directory you chose, you should see your cloud storage content. You can stop the mount with Ctrl+C.
Useful basic commands:
- ls, lsd
- mkdir, rmdir
- copy, sync
- delete
- ncdu
- cat
See full list of commands from the Rclone website.
Quick summary of the steps done:
- Create a remote
- Create a directory/bucket on the remote
- Create a new remote where storage is “crypt” and remote “remote:directory”
- Copy your files
One thought on “Easy Encrypted Cloud Storage & Backups With Rclone”