

Most Linux distributions ship the hard drive partition tool fdisk by default. Knowing how to use it is a good skill for every Linux system administrator since having to rescue a system that has disk issues is a very common task. If the admin is faced with a prompt in a rescue mode boot, often fdisk is the only partitioning tool available and must be used, since if the main root filesystem is broken, one cannot install and use any other partitioning tools.
When installing Debian based systems (e.g. Ubuntu) in the text mode server installer, keep in mind that you can at any time during the installation process press Ctrl+Alt+F2 to jump to a text console running a limited shell prompt (Busybox) and manipulate the systems as you wish, among others run fdisk. When done press Ctrl+Alt+F1 to jump back to the installer screen.
In fact, fdisk is not a single utility but actually a tool that ships with three commands together: fdisk, sfdisk and cfdisk.
fdisk
Most Linux sysadmins have at some point used fdisk, the classic partitioning tool. There is also a tool with the same name in Windows, but its not the same tool. Across the Unix ecosystem the fdisk tool is however nowadays the same one, even on MacOS X.
To list the current partition layout one can simply run fdisk -l /dev/sda. Below is an example of the output. One can also run fdisk -l /dev/sd* to print the partition info of all sd devices in one go. The fdisk man page lists all the command line parameters available.
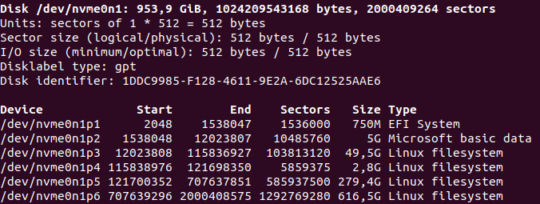
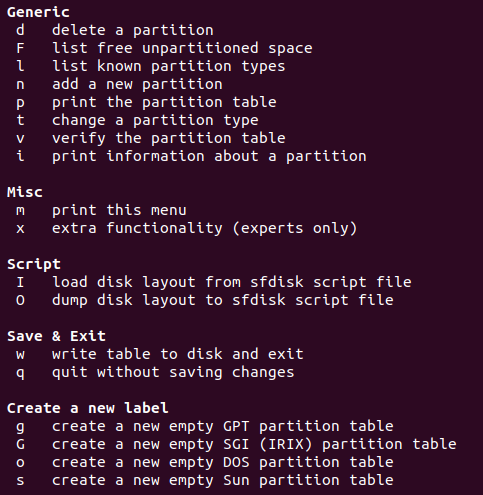
fdisk -lIf one runs just fdisk it will launch in interactive mode. Pressing m will show the help. To create a new GPT (for modern disk) partition table (resetting any existing partition table) and add a new Linux partition that uses all available disk space one can simply enter the commands g, n and w in sequence and pressing enter to all questions to accept them at their default values.
mcfdisk
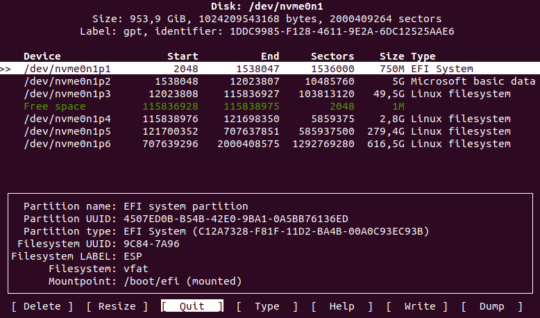
The command cfdisk servers the same purpose as fdisk with the difference that it provides a slightly fancier user interface based on ncurses so there are menus one can browse with arrows and the tab button without having to remember the single letter commands fdisk uses.
sfdisk
The third tool in the suite is sfdisk. This tool is designed to be scripted, enabling administrators to script and automate partitioning operations.
The key to sfdisk operations is to first dump the current layout using the -d argument, for example sfdisk -d /dev/sda > partition-table. An example output would be:
$ cat partition-table
label: gpt
label-id: AF7B83C8-CE8D-463D-99BF-E654A68746DD
device: /dev/sda
unit: sectors
first-lba: 34
last-lba: 937703054

/dev/sda1 : start=        2048, size=      997376, type=C12A7328-F81F-11D2-BA4B-00A0C93EC93B, uuid=F35A875F-1A53-493E-85D4-870A7A749872
/dev/sda2 : start=      999424, size=   936701952, type=A19D880F-05FC-4D3B-A006-743F0F84911E, uuid=725EAB2A-F2E2-475E-81DC-9A5E18E29678
This text file describes the partition type, the layout and also includes the device UUIDs. The file above can be considered a backup of the /dev/sda partition table. If something has gone wrong with the partition table and this file was saved at some earlier time, one can recover the partition table by running: sfdisk /dev/sda < partition-table.
Copying the partition table to multiple disks
One neat application of sfdisk is that it can be used to copy the partition layout to many devices. Say you have a big server computer with 16 hard disks. Once you have partitioned the first disk, you can dump the partition table of the first disk with sfdisk -d and then edit the dump file (remember, it is just a plain-text file) to remove references to the device name and UUID’s, which are unique to a specific device and not something you want to clone to other disks. If the initial dump was the example above, the version with unique identifiers removed would look like this:
label: gpt
unit: sectors
first-lba: 34
last-lba: 937703054

start=        2048, size=      997376, type=0FC63DAF-8483-4772-8E79-3D69D8477DE4
start=      999424, size=   936701952, type=A19D880F-05FC-4D3B-A006-743F0F84911E
This can applied to the another disk, for example /dev/sdb simply by running sfdisk /dev/sdb < partition-table. Now all the admin needs to do is run this same command a couple of times with only the one character changed on each invocation.
Listing device UUID’s with blkid
Keep in mind that the Linux kernel uses the device UUIDs for indentifying partitions and file systems. Be vary not to accidentally make two disks have the same UUID with sfdisk. Technically it is possible, and maybe useful in some situation where one wants to replace a hard drive and make the new hard drive 100% identical, but in a running system different disks should all have unique UUIDs.
To list all UUIDs use blkid. Below is an example of the output:
$ blkid
/dev/sda1: UUID="F379-8147" TYPE="vfat" PARTUUID="f35a875f-1a53-493e-85d4-870a7a749872"
/dev/sda2: UUID="5f12f800-1d8d-6192-0881-966a70daa16f" UUID_SUB="2d667c5b-b9f3-6510-cf76-9231122533ce" LABEL="fi-e3:0" TYPE="linux_raid_member" PARTUUID="725eab2a-f2e2-475e-81dc-9a5e18e29678"
/dev/sdb2: UUID="5f12f800-1d8d-6192-0881-966a70daa16f" UUID_SUB="0221fce5-2762-4b06-2d72-4f4f43310ba0" LABEL="fi-e3:0" TYPE="linux_raid_member" PARTUUID="cd2a477f-0b99-4dfc-baa6-f8ebb302cbbb"
/dev/md0: UUID="dcSgSA-m8WA-IcEG-l29Q-W6ti-6tRO-v7MGr1" TYPE="LVM2_member"
/dev/mapper/ssd-ssd--swap: UUID="2f2a93bd-f532-4a6d-bfa4-fcb96fb71449" TYPE="swap"
/dev/mapper/ssd-ssd--root: UUID="660ce473-5ad7-4be9-a834-4f3d3dfc33c3" TYPE="ext4"
Extra tip: listing all disk with lsblk
While fdisk -l is nice for listing partition tables, often admins also want to know the partition sizes in human readable formats and what the partitions are used for. For this purpose the command lsblk is handy. While the default output is often enough, supplying the extra arguments -o NAME,SIZE,FSTYPE,TYPE,MOUNTPOINTmakes it even better. See below an example of the output:
$ lsblk -o NAME,SIZE,FSTYPE,TYPE,MOUNTPOINT
NAME                  SIZE FSTYPE            TYPE  MOUNTPOINT
sda                 447,1G                   disk
├─sda1                487M vfat              part  /boot/efi
└─sda2              446,7G linux_raid_member part
  └─md0             446,5G LVM2_member       raid1
    ├─ssd-ssd--swap   8,8G swap              lvm   [SWAP]
    └─ssd-ssd--root 437,7G ext4              lvm   /
sdb                 447,1G                   disk
├─sdb1                487M                   part
└─sdb2              446,7G linux_raid_member part
  └─md0             446,5G LVM2_member       raid1
    ├─ssd-ssd--swap   8,8G swap              lvm   [SWAP]
    └─ssd-ssd--root 437,7G ext4              lvm   /
sdc                 447,1G                   disk
├─sdc1                487M                   part
└─sdc2              446,7G                   part
A word of warning…
Remember that modifying the partition table is a destructive process. It is something the admin does while installing new systems or recovering broken ones. If done wrongly, all data might be lost!
One thought on “Partition like a pro with fdisk, sfdisk and cfdisk”